
目录
介绍
评估测试图像
计算错误分类图像的数量
使用特定数据集评估模型
使用相机图像评估模型
提升网络性能
下一步
- 下载源 - 120.7 MB
DeepFashion等数据集的可用性为时尚行业开辟了新的可能性。在本系列文章中,我们将展示一个AI驱动的深度学习系统,它可以帮助我们更好地了解客户的需求,从而彻底改变时装设计行业。
在这个项目中,我们将使用:
- Jupyter Notebook作为 IDE
- 库:
- TensorFlow 2.0
- NumPy
- MatplotLib
- DeepFashion数据集的自定义子集——相对较小以减少计算和内存开销
我们假设您熟悉深度学习的概念,以及Jupyter Notebooks和TensorFlow。如果您不熟悉Jupyter Notebook,请从本教程开始。欢迎下载项目代码。
在上一篇文章中,我们训练了VGG16模型并评估了它在测试图像集上的性能。在本文中,我们将在一些测试图像以及相机拍摄的图像上评估我们训练的网络,以验证模型在检测可能包含多个服装类别的图像中的真实衣服时的鲁棒性。
评估测试图像让我们将来自牛仔裤类别的图像传递给网络,看看网络是否能够正确分类服装项目。请注意,所选图像将难以分类,因为它将包含不止一种服装类型:例如,牛仔裤和上衣。图像将被preprocess_input读取和处理,调整图像大小并重新缩放以适应训练网络的输入。
from keras.preprocessing import image
from keras.applications.vgg16 import preprocess_input

img_path = r'C:\Users\abdul\Desktop\ContentLab\P2\DeepFashion\Test\Jeans\img_00000052.jpg'
img = image.load_img(img_path, target_size=(224,224))
x = image.img_to_array(img)
x = np.expand_dims(x, axis=0)
x = preprocess_input(x)
plt.imshow(img)
选择图像后,我们将其通过模型并获得输出(预测)。
def get_class_string_from_index(index):
   for class_string, class_index in test_generator.class_indices.items():
      if class_index == index:
         return class_string

Predicted_Class=np.argmax(c, axis = 1)
print('Predicted_Class is:', Predicted_Class)     #Get the rounded value of the predicted class
true_index = 5
# print('true_label is:', true_labels)     #Get the rounded value of the predicted class
print("True label: " + get_class_string_from_index(true_index))
print("Predicted label: " + get_class_string_from_index(Predicted_Class))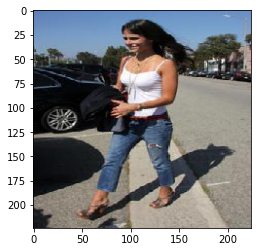
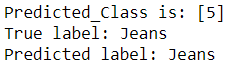
如上图所示,该模型已连续将类别识别为“Jeans”。
计算错误分类图像的数量让我们进一步研究该模型在检测服装类别方面的鲁棒性。为此,我们将创建一个函数,该函数将从测试集中随机选择一批图像并将其传递给模型以预测它们的类别,然后计算错误分类图像的数量。
test_generator = test_datagen.flow_from_directory(test_dir, target_size=(224, 224), batch_size=3, class_mode='categorical')
X_test, y_test = next(test_generator)
X_test=X_test/255
preds = full_model.predict(X_test)
pred_labels = np.argmax(preds, axis=1)
true_labels = np.argmax(y_test, axis=1)
print (pred_labels)
print (true_labels)
正如您在上面看到的,我们将批量大小定义为3以避免计算机内存问题。这意味着网络将只选择三幅图像并对它们进行分类,以计算这三幅图像中误分类图像的数量。您可以根据需要增加批量大小。
现在,让我们计算错误分类图像的数量。
mispred_img = X_test[pred_labels!=true_labels]
mispred_true = true_labels[pred_labels!=true_labels]
mispred_pred = pred_labels[pred_labels!=true_labels]
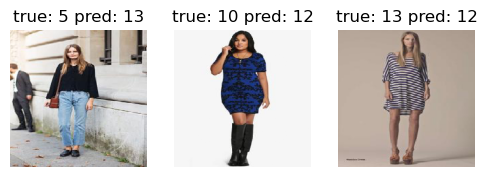
print ('number of misclassified images:', mispred_img.shape[0])如果发现错误分类的图像,让我们使用此函数绘制它们:
def plot_img_results(array, true, pred, i, n=1):
    # plot the image and the target for sample i
    ncols = 3
    nrows = n/ncols + 1
    fig = plt.figure( figsize=(ncols*2, nrows*2), dpi=100)
    for j in range(n):
      index = j+i
      plt.subplot(nrows,ncols, j+1)
      plt.imshow(array[index])
      plt.title('true: {} pred: {}'.format(true[index], pred[index]))
      plt.axis('off')

plot_img_results(mispred_img, mispred_true, mispred_pred, 0, len(mispred_img))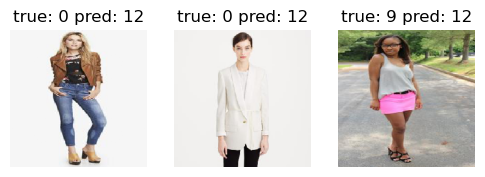


要查看每个类号所指的是哪个类,请运行以下命令:
Classes[13]现在我们将创建一个函数,该函数将从任何数据集中选择任何图像——例如训练、测试或验证——并将结果显示为图像下的“真实与预测类别”。为了使结果更易于解释,我们将显示类别名称(例如“Jeans”)而不是类别编号(例如“5”)。
def get_class_string_from_index(index):
   for class_string, class_index in test_generator.class_indices.items():
      if class_index == index:
         return class_string

test_generator = test_datagen.flow_from_directory(test_dir, target_size=(224, 224), batch_size=7, class_mode='categorical')
X_test, y_test = next(test_generator)
X_test=X_test/255
image = X_test[2]
true_index = np.argmax(y_test(2)])
plt.imshow(image)
plt.axis('off')
plt.show()

# Expand the validation image to (1, 224, 224, 3) before predicting the label
prediction_scores = full_model.predict(np.expand_dims(image, axis=0))
predicted_index = np.argmax(prediction_scores)
print("True label: " + get_class_string_from_index(true_index))
print("Predicted label: " + get_class_string_from_index(predicted_index))
在这一部分中,我们将研究模型在相机拍摄的图像上的性能。我们拍摄了12张放在床上的衣服以及穿着不同类型衣服的人的图像,并让训练有素的模型对它们进行分类。为了让事情变得有趣,我们选择了男装(因为大多数训练图像都是女装)。衣服没有分类。我们只是将它们提供给网络,让它找出这些衣服属于哪个类别。
该网络在高质量图像(未翻转的高对比度图像)方面表现良好。一些图像被分配了正确的类别,一些图像被分配了相似的类别,而另一些则被错误地标记。

正如我们在前几节中所展示的,网络性能非常好。但是,它可以改进。是关于数据的吗?是的,它是:原始的DeepFashion数据集很大,我们只使用了其中很小的一部分。
让我们使用数据增强来增加网络训练数据的数量。当在各种类型和不同质量的新图像上进行测试时,这可能会提高网络的性能。数据增强的目标是增强网络的泛化能力。这个目标是通过在增强图像上训练网络来实现的,增强图像可以覆盖训练网络在真实图像上测试时可能遇到的所有图像排列。
在Keras中,数据增强很容易实现。您可以简单地将所需类型的增强操作添加到ImageDataGenerator函数中:旋转、缩放、平移平移、翻转等。我们实现了增强的DataLoad函数如下所示:
from tensorflow.keras.preprocessing.image import ImageDataGenerator

batch_size = 3

def DataLoad(shape, preprocessing):
    '''Create the training and validation datasets for
    a given image shape.
    '''
    imgdatagen = ImageDataGenerator(
        preprocessing_function = preprocessing,
  rotation_range=10, width_shift_range=0.1, height_shift_range=0.1, shear_range=0.15, z         oom_range=0.1,
        channel_shift_range=10., horizontal_flip=True,
        validation_split = 0.1,
    )

    height, width = shape

    train_dataset = imgdatagen.flow_from_directory(
        os.getcwd(),
        target_size = (height, width),
        classes = ['Blazer', 'Blouse', 'Cardigan', 'Dress', 'Jacket',
                 'Jeans', 'Jumpsuit', 'Romper', 'Shorts', 'Skirts', 'Sweater', 'Sweatpants', 'Tank', 'Tee', 'Top'],
        batch_size = batch_size,
        subset = 'training',
    )

    val_dataset = imgdatagen.flow_from_directory(
        os.getcwd(),
        target_size = (height, width),
        classes = ['Blazer', 'Blouse', 'Cardigan', 'Dress', 'Jacket',
                 'Jeans', 'Jumpsuit', 'Romper', 'Shorts', 'Skirts', 'Sweater', 'Sweatpants', 'Tank', 'Tee', 'Top'],
        batch_size = batch_size,
        subset = 'validation'
    )
    return train_dataset, val_dataset
下面的代码ImageDataGenerator通过一些示例展示了如何增强图像。
import matplotlib.pyplot as plt
import numpy as np
import os
import random
import tensorflow as tf
from tensorflow import keras
from tensorflow.keras.preprocessing.image import ImageDataGenerator
%matplotlib inline

def plotImages(images_arr):
    fig, axes = plt.subplots(1, 10, figsize=(20,20))
    axes = axes.flatten()
    for img, ax in zip( images_arr, axes):
        ax.imshow(img)
        ax.axis('off')
    plt.tight_layout()
    plt.show()

gen = ImageDataGenerator(rotation_range=10, width_shift_range=0.1, height_shift_range=0.1, shear_range=0.15, zoom_range=0.1,
    channel_shift_range=10., horizontal_flip=True)
现在,我们可以读取任何图像并显示它,以及它的增强导数。
image_path = r'C:\Users\abdul\Desktop\ContentLab\P2\DeepFashion\Train\Blouse\img_00000003.jpg'
image = np.expand_dims(plt.imread(image_path),0)
plt.imshow(image[0])
从上图派生的增强图像如下所示。
aug_iter = gen.flow(image)
aug_images = [next(aug_iter)[0].astype(np.uint8) for i in range(10)]
plotImages(aug_images)
在接下来的文章中,我们将向您展示如何构建生成对抗网络(GAN)的时装设计生成。敬请关注!
https://www.codeproject.com/Articles/5297329/Running-AI-Fashion-Classification-on-Real-Data

