
- 1. 环境准备
- 2. 创建Service
- 3. 查看service
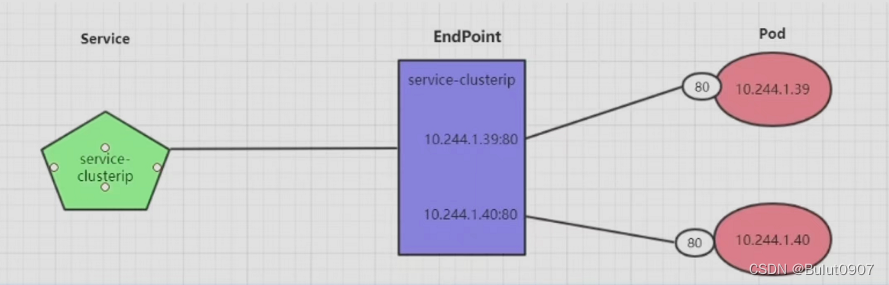
- 4. Endpoint
- 5. 访问Service
- 6. 删除service
- 7. HeadLiness类型的Service
- 7.1 概述
- 7.2 创建Service
- 7.3 查询Service
- 7.3 查看域名解析情况
- 7.4 通过Service的域名进行查询
首先利用Deployment创建出3个Pod,为Pod设置app=nginx-pod的标签
新建pod-controller.yaml,内容如下。然后运行deployment
[root@k8s-master ~]# cat pod-controller.yaml
apiVersion: apps/v1
kind: Deployment
metadata:
  name: pod-controller
  namespace: dev
  labels:
    controller: deploy
spec:
  replicas: 3
  selector:
    matchLabels:
      app: nginx-pod
  template:
    metadata:
      labels:
        app: nginx-pod
    spec:
      containers:
        - name: nginx
          image: nginx:latest
          ports:
            - name: nginx-port
              containerPort: 80
              protocol: TCP
[root@k8s-master ~]#
[root@k8s-master ~]# kubectl apply -f pod-controller.yaml
deployment.apps/pod-controller created
[root@k8s-master ~]#
查看3个pod的信息
[root@k8s-master ~]# kubectl get pod -n dev -o wide
NAME                              READY   STATUS    RESTARTS   AGE     IP               NODE        NOMINATED NODE   READINESS GATES
pod-controller-5b899bbdb4-267mq   1/1     Running   0          2m15s   10.244.36.124    k8s-node1
pod-controller-5b899bbdb4-ffkgj   1/1     Running   0          2m15s   10.244.169.154   k8s-node2
pod-controller-5b899bbdb4-hf75p   1/1     Running   0          2m15s   10.244.169.152   k8s-node2
[root@k8s-master ~]#
然后将每个nginx的首页内容,修改成各自的pod IP地址。这里以10.244.36.124上的nginx为例,其它两个操作类似
[root@k8s-master ~]# kubectl exec -it pod-controller-5b899bbdb4-267mq -c nginx -n dev -- /bin/bash
root@pod-controller-5b899bbdb4-267mq:/#
root@pod-controller-5b899bbdb4-267mq:/# echo "10.244.36.124" > /usr/share/nginx/html/index.html
root@pod-controller-5b899bbdb4-267mq:/#
root@pod-controller-5b899bbdb4-267mq:/# exit
exit
[root@k8s-master ~]#
[root@k8s-master ~]# curl 10.244.36.124:80
10.244.36.124
[root@k8s-master ~]#
新建service-clusterIp.yaml,内容如下。然后运行service
[root@k8s-master ~]# cat service-clusterIp.yaml
apiVersion: v1
kind: Service
metadata:
  name: service-clusterip
  namespace: dev
spec:
  selector:
    app: nginx-pod
  type: ClusterIP
  clusterIP: 10.96.68.68
  sessionAffinity: ClientIP
  ports:
    - protocol: TCP
      port: 80
      targetPort: 80
[root@k8s-master ~]#
[root@k8s-master ~]# kubectl apply -f service-clusterIp.yaml
service/service-clusterip created
[root@k8s-master ~]#
查看service信息
[root@k8s-master ~]# kubectl get svc -n dev -o wide
NAME                TYPE        CLUSTER-IP    EXTERNAL-IP   PORT(S)   AGE   SELECTOR
service-clusterip   ClusterIP   10.96.68.68           80/TCP    99s   app=nginx-pod
[root@k8s-master ~]#
查看service详细信息
[root@k8s-master ~]# kubectl describe svc service-clusterip -n dev
Name:              service-clusterip
Namespace:         dev
Labels:
Annotations:
Selector:          app=nginx-pod
Type:              ClusterIP
IP Family Policy:  SingleStack
IP Families:       IPv4
IP:                10.96.68.68
IPs:               10.96.68.68
Port:                80/TCP
TargetPort:        80/TCP
Endpoints:         10.244.169.152:80,10.244.169.154:80,10.244.36.124:80
Session Affinity:  ClientIP
Events:
[root@k8s-master ~]#
Endpoints列表中,就是Service可以负载到的Pod服务入口
查看ipvs的映射规则
[root@k8s-master ~]# ipvsadm -Ln
......省略部分......
TCP  10.96.68.68:80 rr persistent 10800
  -> 10.244.36.124:80             Masq    1      0          0
  -> 10.244.169.152:80            Masq    1      0          0
  -> 10.244.169.154:80            Masq    1      0          0
......省略部分......
[root@k8s-master ~]#
其中persistent 10800表示client的session时长为3小时。rr表示轮询
Endpoint是kubernetes中的一个资源对象,存储在etcd中,用来记录一个service对应的所有Pod的访问地址,它是根据service配置文件中的selector描述产生的
 查看Endpoint
[root@k8s-master ~]# kubectl get endpoints -n dev -o wide
NAME                ENDPOINTS                                              AGE
service-clusterip   10.244.169.152:80,10.244.169.154:80,10.244.36.124:80   14m
[root@k8s-master ~]#
默认使用kube-proxy的轮询访问策略。我们这里设置sessionAffinity: ClientIP,会基于客户端地址的会话保持模式,即来自同一个客户端的一定时间访问内发起的所有请求都会转发到固定的一个Pod上
[root@k8s-master ~]# curl 10.96.68.68:80
10.244.36.124
[root@k8s-master ~]# curl 10.96.68.68:80
10.244.36.124
[root@k8s-master ~]# curl 10.96.68.68:80
10.244.36.124
[root@k8s-master ~]#
[root@k8s-master ~]# kubectl delete svc service-clusterip -n dev
service "service-clusterip" deleted
[root@k8s-master ~]#
在某些场景中,可能不想使用Service提供的负载均衡功能,而希望自己来控制负载均衡策略,针对这种情况,kubernetes提供了HeadLinesss Service,这类Service不会分配Cluster IP,只能通过Service的域名进行访问
7.2 创建Service新建service-headliness.yaml,其中clusterIP: None,内容如下。然后运行service
[root@k8s-master ~]# cat service-headliness.yaml
apiVersion: v1
kind: Service
metadata:
  name: service-headliness
  namespace: dev
spec:
  selector:
    app: nginx-pod
  type: ClusterIP
  clusterIP: None
  sessionAffinity: ClientIP
  ports:
    - protocol: TCP
      port: 80
      targetPort: 80
[root@k8s-master ~]#
[root@k8s-master ~]# kubectl apply -f service-headliness.yaml
service/service-headliness created
[root@k8s-master ~]#
[root@k8s-master ~]# kubectl get svc service-headliness -n dev -o wide
NAME                 TYPE        CLUSTER-IP   EXTERNAL-IP   PORT(S)   AGE   SELECTOR
service-headliness   ClusterIP   None                 80/TCP    63s   app=nginx-pod
[root@k8s-master ~]#
[root@k8s-master ~]# kubectl describe svc service-headliness -n dev
Name:              service-headliness
Namespace:         dev
Labels:
Annotations:
Selector:          app=nginx-pod
Type:              ClusterIP
IP Family Policy:  SingleStack
IP Families:       IPv4
IP:                None
IPs:               None
Port:                80/TCP
TargetPort:        80/TCP
Endpoints:         10.244.169.152:80,10.244.169.154:80,10.244.36.124:80
Session Affinity:  ClientIP
Events:
[root@k8s-master ~]#
查看pod情况
[root@k8s-master ~]# kubectl get pod -n dev
NAME                              READY   STATUS    RESTARTS   AGE
pod-controller-5b899bbdb4-267mq   1/1     Running   0          48m
pod-controller-5b899bbdb4-ffkgj   1/1     Running   0          48m
pod-controller-5b899bbdb4-hf75p   1/1     Running   0          48m
[root@k8s-master ~]#
进入Pod中,执行cat /etc/resolv.conf命令
[root@k8s-master ~]# kubectl exec -it pod-controller-5b899bbdb4-267mq -c nginx -n dev -- /bin/bash
root@pod-controller-5b899bbdb4-267mq:/#
root@pod-controller-5b899bbdb4-267mq:/# cat /etc/resolv.conf
search dev.svc.cluster.local svc.cluster.local cluster.local
nameserver 10.96.0.10
options ndots:5
root@pod-controller-5b899bbdb4-267mq:/#
[root@k8s-master ~]# yum -y install bind-utils
[root@k8s-master ~]# dig @10.96.0.10 service-headliness.dev.svc.cluster.local
; DiG 9.11.4-P2-RedHat-9.11.4-26.P2.el7_9.9 @10.96.0.10 service-headliness.dev.svc.cluster.local
; (1 server found)
;; global options: +cmd
;; Got answer:
;; WARNING: .local is reserved for Multicast DNS
;; You are currently testing what happens when an mDNS query is leaked to DNS
;; ->>HEADER
关注
打赏
最近更新
- 深拷贝和浅拷贝的区别(重点)
- 【Vue】走进Vue框架世界
- 【云服务器】项目部署—搭建网站—vue电商后台管理系统
- 【React介绍】 一文带你深入React
- 【React】React组件实例的三大属性之state,props,refs(你学废了吗)
- 【脚手架VueCLI】从零开始,创建一个VUE项目
- 【React】深入理解React组件生命周期----图文详解(含代码)
- 【React】DOM的Diffing算法是什么?以及DOM中key的作用----经典面试题
- 【React】1_使用React脚手架创建项目步骤--------详解(含项目结构说明)
- 【React】2_如何使用react脚手架写一个简单的页面?

